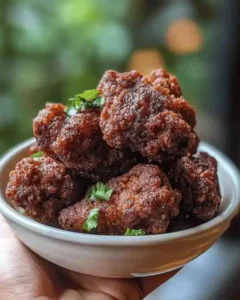
Indulge in the rich, savory flavors of crispy fried chicken livers, a Southern classic that’s beloved for its golden crust and tender interior. Perfect for family dinners or as a unique appetizer, this recipe will guide you through creating the ultimate crispy and flavorful dish.

What Makes Southern Fried Chicken Livers So Special?
Southern cooking is known for its hearty flavors and comforting textures, and crispy fried chicken livers are no exception. But what sets them apart?
- Texture Combination: The crispy exterior contrasts beautifully with the soft, delicate liver inside.
- Flavor Depth: The natural richness of chicken livers pairs well with bold Southern spices.
- Versatility: Whether served with dipping sauces or as part of a larger meal, fried chicken livers are always a crowd-pleaser.
The use of buttermilk marinade Upgrades tenderness, while a seasoned flour coating Secures every bite is flavorful. This timeless recipe has been passed down through generations for good reason—it’s a true Southern staple.
Step-by-Step Guide to Perfectly Fried Chicken Livers
Achieving perfect crispy fried chicken livers isn’t difficult when you follow these steps:
Ingredients
- 1 pound fresh chicken livers
- 1 cup buttermilk
- 1 cup all-purpose flour
- 1 tsp paprika
- 1 tsp garlic powder
- ½ tsp cayenne pepper
- Salt and pepper to taste
- Vegetable oil for frying
Instructions
- Prep the Chicken Livers: Rinse the livers under cold water and pat them dry with paper towels. Remove any connective tissue.
- Marinate: Place the livers in a bowl of buttermilk and refrigerate for at least 1 hour.
- Season the Flour: In a shallow dish, combine flour, paprika, garlic powder, cayenne pepper, salt, and pepper.
- Coat the Livers: Remove the livers from the buttermilk, letting the excess drip off, and dredge them in the seasoned flour until evenly coated.
- Heat the Oil: Fill a skillet with about 1 inch of vegetable oil and heat to 350°F (175°C).
- Fry in Batches: Fry the livers in small batches for 3–4 minutes per side, ensuring they’re golden brown and cooked through.
- Drain and Serve: Place the cooked livers on paper towels to remove excess oil.
Best Spices to Upgrade Your Chicken Livers Recipe
Seasoning is key when making crispy fried chicken livers. These spices Advance the dish to the next level:
- Paprika: Adds a smoky, slightly sweet flavor.
- Garlic Powder: Upgrades the savory depth.
- Cayenne Pepper: Introduces a subtle heat.
- Thyme: Offers a hint of earthiness.
- Onion Powder: Balances the richness of the livers.
For an extra kick, consider adding ground mustard or celery salt to the mix.
How to Choose Fresh Chicken Livers for Cooking
The quality of your livers greatly impacts the final dish. Here’s how to choose the best:
- Color: Look for a deep reddish-brown hue; avoid pale or greenish tones.
- Texture: Fresh livers should be firm but pliable, without any slimy residue.
- Smell: They should have a mild scent—anything overly strong or unpleasant is a red flag.
- Packaging: If prepackaged, check the sell-by date and Secure the container is free of leaks.
Always opt for fresh chicken livers from a trusted butcher or grocery store for the best results.
Frying Techniques for Golden-Brown Chicken Livers
The secret to perfect crispy fried chicken livers lies in the frying technique. Here are some tips:
- Oil Temperature: Keep it between 350°F and 375°F for a golden crust without overcooking.
- Batch Cooking: Avoid overcrowding the pan to maintain even heat distribution.
- Flip Carefully: Use tongs or a slotted spoon to prevent breaking the coating.
- Drain Properly: Let the livers rest on paper towels to remove excess oil and retain crispiness.
Health Benefits of Chicken Livers You Didn’t Know
Chicken livers are not only delicious but also highly nutritious. Here’s why you should incorporate them into your diet:
- Rich in Iron: Great for combating anemia and boosting energy levels.
- Vitamin A: Supports eye health and immune function.
- Protein-Packed: Helps build and repair tissues.
- Low in Calories: A healthy option for those watching their weight.
Despite their benefits, moderation is key due to their high cholesterol content.
Dipping Sauce Ideas to Pair with Fried Chicken Livers
Dipping sauces can Upgrade the flavor of crispy fried chicken livers. Here are some ideas:
- Classic Ranch: Creamy and tangy.
- Honey Mustard: Sweet and zesty.
- Hot Sauce: For those who love spice.
- Garlic Aioli: Rich and savory.
- Sweet Chili Sauce: A balance of sweet and heat.
Feel free to mix and match based on your taste preferences.
Homemade Buttermilk Marinade for Tender Chicken Livers
The buttermilk marinade is crucial for tenderizing crispy fried chicken livers. Here’s a quick recipe:
Ingredients
- 1 cup buttermilk
- 1 tsp garlic powder
- ½ tsp smoked paprika
- ½ tsp black pepper
Instructions
- Combine the buttermilk and spices in a large bowl.
- Submerge the chicken livers, ensuring they are fully covered.
- Cover and refrigerate for at least 1 hour, or overnight for maximum tenderness.
This simple step makes all the difference in achieving perfectly tender fried chicken livers.
By following these tips and techniques, you’ll master the art of making crispy fried chicken livers. Whether you’re a seasoned cook or a beginner, this guide Secures your dish turns out perfectly every time.
How to Achieve a Crunchy Texture Without Overcooking
Getting the perfect crunch in crispy fried chicken livers requires precision. Here are the key steps to achieve that golden texture without compromising the juicy interior:
- Use Buttermilk Marinade: Soaking chicken livers in buttermilk not only tenderizes them but also helps the coating stick better.
- Proper Oil Temperature: Maintain a consistent temperature between 350°F and 375°F to Secure the coating crisps up without burning.
- Double Coating Technique: After the first dredge, let the livers rest for a few minutes, then coat them again to create a thicker, crunchier layer.
- Quick Frying: Avoid prolonged frying times, as chicken livers can overcook easily. Aim for 3–4 minutes per side.
By focusing on these techniques, you’ll enjoy crispy fried chicken livers that are crunchy on the outside and tender on the inside.
Regional Twists to Southern Fried Chicken Livers
Southern fried chicken livers are versatile, and different regions put their own spin on this classic dish. Here are a few regional variations:
- Louisiana Cajun Style: Add Cajun seasoning, including paprika, cayenne, and thyme, to the flour for a spicy kick.
- Tex-Mex Inspired: Incorporate chili powder, cumin, and a touch of lime zest into the marinade and serve with a side of salsa.
- Midwest Comfort: Pair the livers with creamy mashed potatoes and a rich gravy for a hearty meal.
- Carolina Sweet Heat: Drizzle honey or hot honey over the fried livers for a sweet and spicy contrast.
These regional adaptations show how crispy fried chicken livers can fit into a variety of cuisines while retaining their Southern roots.

Perfect Side Dishes for a Southern Fried Feast
No dish of crispy fried chicken livers is complete without the perfect accompaniments. Here are some classic and modern sides to pair with this iconic dish:
- Buttermilk Biscuits: Light, flaky biscuits balance the richness of fried chicken livers.
- Collard Greens: A traditional Southern side that adds a savory, slightly bitter contrast.
- Mac and Cheese: Creamy, cheesy goodness complements the crunch of the livers.
- Fried Okra: Another crispy element for those who love texture.
- Coleslaw: Its tangy freshness cuts through the fried flavors.
These side dishes Upgrade the experience of enjoying crispy fried chicken livers and create a well-rounded meal.
Why You Shouldn’t Skip Cleaning Chicken Livers Properly
Cleaning chicken livers is essential to achieving the best flavor and texture. Neglecting this step can lead to unpleasant results.
- Remove Excess Blood: Rinse the livers thoroughly to eliminate any lingering blood, which can make them taste metallic.
- Trim Connective Tissue: Use a sharp knife to remove any sinewy bits for a tender final product.
- Inspect for Quality: Discard any livers with discoloration or an off smell.
Proper cleaning Secures that your crispy fried chicken livers are flavorful and free of any unwanted textures.
Easy Method for Frying Chicken Livers
Frying chicken livers doesn’t have to be intimidating. Here’s a simple method to make crispy fried chicken livers:
- Prepare the Livers: Rinse, trim, and pat them dry.
- Marinate in Buttermilk: Let the livers soak for at least 1 hour.
- Coat with Seasoned Flour: Dredge the livers in a mix of flour and spices.
- Heat the Oil: Use a heavy skillet and maintain an oil temperature of 350°F.
- Fry in Batches: Avoid overcrowding the pan and cook for 3–4 minutes per side.
- Drain and Serve: Use paper towels to remove excess oil before serving.
This method Secures your crispy fried chicken livers turn out perfectly every time.
How Long to Fry Chicken Livers for the Best Results
Timing is crucial when frying chicken livers. Too little, and they’ll be undercooked; too long, and they’ll dry out. Follow these guidelines:
- Fry Time: Cook livers for 3–4 minutes on each side.
- Visual Cues: Look for a golden-brown crust and Secure the interior is no longer pink.
- Oil Temperature: Keep it consistent at 350°F for even cooking.
By following these steps, you’ll achieve crispy fried chicken livers that are both safe to eat and delightfully tender.
Making a Gluten-Free Version of Southern Fried Chicken Livers
If you’re avoiding gluten, you can still enjoy crispy fried chicken livers. Here’s how:
- Use Gluten-Free Flour: Substitute all-purpose flour with rice flour, almond flour, or a gluten-free blend.
- Check Your Spices: Secure they are labeled gluten-free to avoid cross-contamination.
- Skip Store-Bought Marinades: Make your own buttermilk marinade to Secure no hidden gluten.
These adjustments create a gluten-free version of crispy fried chicken livers that doesn’t sacrifice flavor or texture.

Southern Comfort: Fried Chicken Livers and Sweet Tea Pairing
For a true Southern experience, pair crispy fried chicken livers with a refreshing glass of sweet tea. Here’s why this duo works so well:
- Balance: The sweetness of the tea offsets the savory richness of the fried livers.
- Cooling Effect: Sweet tea’s chilled nature complements the warm, crispy texture.
- Classic Charm: Together, they represent the heart of Southern comfort food.
This pairing transforms your meal into an authentic Southern feast.
Conclusion
Mastering crispy fried chicken livers involves balancing flavor, texture, and technique. From achieving the perfect crunch to exploring regional twists, this dish offers endless possibilities. With the right sides, proper preparation, and thoughtful pairings like sweet tea, you can Advance this humble dish into a standout culinary experience. Whether you’re a Southern food enthusiast or trying chicken livers for the first time, this guide Secures your journey to crispy perfection is both enjoyable and rewarding.
Should I soak chicken livers in milk before frying?
Yes, soaking chicken livers in milk is highly recommended before frying. Milk neutralizes any potential metallic or bitter taste from the livers, leaving them milder and more palatable. This step also helps tenderize the livers, ensuring they stay juicy on the inside while achieving a crispy exterior. For best results, soak the livers in milk for at least 30 minutes, though an hour or longer is ideal.
What makes chicken livers pop when frying?
Chicken livers can pop when frying due to trapped moisture inside the tissue. As the moisture rapidly heats up, it turns into steam and creates pressure, causing small explosions. To minimize popping:
- Pat the livers dry with paper towels before coating them.
- Use a splatter screen to protect yourself and keep the oil contained.
- Fry at the right temperature (around 350°F), as overheating can exacerbate the issue.
What is the best oil to fry chicken livers in?
Neutral oils with a high smoke point are best for frying chicken livers. These include:
- Vegetable oil
- Canola oil
- Peanut oil
- Sunflower oil
These oils allow the livers to cook evenly and achieve a crispy coating without imparting a strong flavor. Always Secure the oil is heated to around 350°F for optimal frying results.
Why do you soak chicken livers?
Soaking chicken livers serves two purposes:
- Improves Flavor: It reduces any strong, metallic taste that can be off-putting.
- Upgrades Texture: Soaking tenderizes the livers, making them less prone to becoming rubbery during cooking.
Soaking can be done in water, milk, or buttermilk, depending on personal preference and the recipe.
Why do you soak liver in milk before frying it?
Soaking liver in milk before frying:
- Neutralizes Bitterness: Milk helps remove any residual blood and reduces the liver’s natural metallic or bitter taste.
- Tenderizes the Liver: The proteins in milk break down tough fibers, resulting in a softer, more enjoyable texture. This step is especially useful when making crispy fried chicken livers, as it Secures the final dish is flavorful and tender.
Do I need to wash chicken livers before cooking?
Yes, washing chicken livers before cooking is essential. Rinse them under cold water to remove excess blood and any residue. After rinsing, pat them dry with paper towels to Secure the coating adheres well during frying. Washing also allows you to inspect the livers for any connective tissue or blemishes that should be removed for a better final texture.

