

Introduction to Bread Recipes
Making the perfect bread recipe at home is simpler than you might think! Whether you’re a seasoned baker or a curious beginner, a good bread recipe can transform your kitchen into a bakery. From fluffy white loaves to tangy sourdough, mastering a bread recipe gives you the freedom to create fresh, delicious, and preservative-free bread tailored to your tastes. In this guide, we’ll cover the key ingredients, common mistakes, and secrets to moist bread so you can confidently bake the perfect bread recipe every time.
What Makes a Bread Recipe Special?
What Makes Bread recipe Special?
Bread is more than just a staple food—it’s a cultural symbol and a source of comfort worldwide. From the soft, fluffy interior to the golden, crispy crust, each loaf tells a story of tradition, community, and creativity. Whether it’s a warm loaf of sourdough or a simple sandwich bread, bread has a way of bringing people together, offering nourishment and connection.
Homemade bread, in particular, adds an element of love and care. Unlike store-bought bread, which often contains preservatives and unnecessary additives, homemade bread allows you to control every ingredient, ensuring the healthiest and most flavorful results.
Why Homemade Bread Is Worth It
Making bread at home may seem intimidating at first, but it’s well worth the effort. First, the freshness of homemade bread is unmatched. That first bite into a freshly baked loaf, still warm from the oven, is something no store-bought loaf can replicate.
Second, homemade bread is highly customizable. Whether you want to add herbs, seeds, or sweet flavors, you can experiment to your heart’s content. Plus, it’s an excellent opportunity to cater to dietary preferences, such as gluten-free or whole-grain options.
Lastly, the therapeutic process of baking bread is another reason to try it. The act of kneading, shaping, and watching dough rise is not just about baking—it’s a mindful and relaxing experience.
Ready to start your bread-making journey? Let’s move on to the core of bread-making: the 7 main ingredients that every great loaf needs.
The 7 Main Ingredients for a Perfect Bread Recipe
Flour: The Foundation of bread recipe
Flour is the backbone of any bread recipe. It provides the structure, thanks to the gluten proteins that create elasticity and trap air, allowing the bread to rise. While all-purpose flour works well for most recipes, bread flour is the gold standard due to its higher protein content. For specialty breads, you can also experiment with whole wheat, rye, or gluten-free flours to achieve unique flavors and textures.
Water: The Hydration Factor
Water activates the gluten in the flour and hydrates the yeast, kickstarting the fermentation process. The amount of water used affects the dough’s consistency, with wetter doughs producing softer, airier bread. Some recipes use milk instead of water for a richer texture, but water remains the most versatile option.
Yeast: The Rising Agent
Yeast is the magic ingredient that makes bread rise. It ferments the sugars in the dough, producing carbon dioxide that creates those airy pockets we love. Whether you use active dry yeast, instant yeast, or a natural sourdough starter, proper activation and proofing are key to a well-risen loaf.
Salt: Enhancing Flavor
Salt does more than add flavor—it controls the fermentation process by slowing down yeast activity, ensuring the dough rises evenly. Without salt, bread can taste flat and rise too quickly, compromising its texture and flavor.
Sugar: Feeding the Yeast
Sugar isn’t always necessary in bread recipes, but it serves a dual purpose when included. It feeds the yeast, helping the dough rise faster, and adds a subtle sweetness that enhances the overall taste. For sweet breads, you can increase the sugar for a dessert-like flavor.
Oil or Butter: Adding Moisture
Fats like oil, butter, or even shortening make bread softer and improve its shelf life. They also contribute to a tender crumb and enhance the overall mouthfeel of the bread. A small amount goes a long way, so use fats sparingly unless you’re making rich, buttery breads like brioche.
Optional Ingredients for Flavor Variety
Beyond the basics, you can add a variety of ingredients to customize your bread. Herbs, garlic, cheese, nuts, seeds, or dried fruits can turn a simple loaf into a gourmet creation. Don’t be afraid to experiment!
Step-by-Step Guide to Mastering Any Bread Recipe
Mixing Ingredients Like a Pro
The first step in making bread is combining the ingredients. Start by mixing the dry ingredients (flour, salt, and yeast) in one bowl and the wet ingredients (water, milk, or oil) in another. Gradually add the wet ingredients to the dry ones, stirring until the dough begins to form. If the dough feels too sticky, sprinkle in a little more flour. Avoid overloading with flour, as it can make the bread dense and dry.
Kneading: Building Gluten Strength
Kneading is a critical step that develops the gluten in the dough. Gluten is what gives bread its structure, elasticity, and chewy texture. Turn the dough onto a floured surface and knead it with the heel of your hands for 8–10 minutes. The dough should become smooth and elastic. If you’re using a stand mixer with a dough hook, knead for about 5 minutes.
The First Rise: Proofing the Dough
Once kneaded, place the dough in a lightly greased bowl, cover it with a clean kitchen towel or plastic wrap, and let it rise in a warm, draft-free area. This is called proofing, and it allows the yeast to ferment and expand the dough. Depending on the recipe, this process can take 1–2 hours or until the dough has doubled in size.
Shaping and Second Proof
After the first rise, punch down the dough to release excess air and shape it into your desired form—whether it’s a loaf, rolls, or artisan-style bread. Transfer it to a greased baking pan or baking sheet, cover again, and let it proof a second time for 30–60 minutes. This final rise ensures the bread will be light and fluffy after baking.
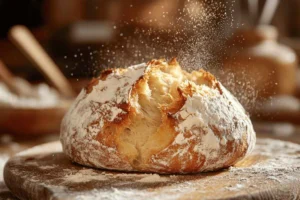
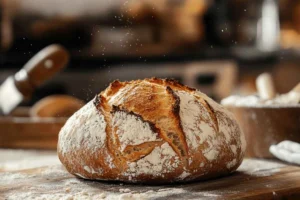
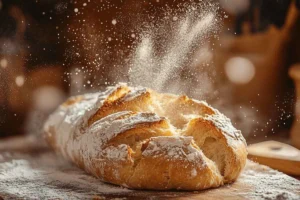
Baking for the Perfect Crust
Preheat your oven to the recommended temperature, usually between 375°F and 450°F. Bake the bread until it’s golden brown and sounds hollow when tapped on the bottom. To create a crispy crust, place a pan of water in the oven for added steam. Let the bread cool before slicing to maintain its texture.
Is It Cheaper to Make bread recipe Than Buy It?
Cost Comparison of Homemade vs. Store-Bought Bread
One of the first questions many people ask is whether baking bread at home is more economical than buying it. The answer is: yes, most of the time. The cost of basic ingredients like flour, water, yeast, and salt is minimal compared to the price of a high-quality loaf at the store. On average, a homemade loaf costs about $1–$2, whereas artisan or specialty bread from a bakery can cost upwards of $5–$8.
Additionally, when baking at home, you get more control over the quality of ingredients. Organic, whole-grain, or preservative-free breads tend to be much pricier at stores but can be made at home for a fraction of the cost.
Hidden Savings: Better Nutrition and Reduced Waste
Homemade bread isn’t just cheaper—it’s healthier. Many store-bought breads contain preservatives, added sugars, and artificial ingredients to extend their shelf life. Baking at home eliminates these unwanted extras and ensures you know exactly what’s in your bread.
Moreover, baking bread can help reduce food waste. Leftover bread can be repurposed into breadcrumbs, croutons, or even bread pudding, giving you more value out of every loaf. This versatility saves money over time.
The Time Factor: Is It Worth It?
While the monetary cost of making bread is lower, there’s no denying that it requires time and effort. From kneading to proofing and baking, the process can take several hours, even if much of that time is hands-off. However, for many, the satisfaction of baking bread and the superior taste make it well worth the investment.
For even more convenience, using a bread machine or preparing no-knead dough can streamline the process without compromising on quality.
Homemade bread offers better value not just in cost, but in nutrition and flavor, making it a rewarding alternative to store-bought loaves.
Common Bread-Making Mistakes and How to Avoid Them
Mistake 1: Using Incorrect Measurements
One of the most common pitfalls in bread-making is inaccurate measurements. Baking is a science, and slight variations can affect the texture, taste, and structure of your bread. Always use a kitchen scale for precise measurements, especially for flour, which can be easily over-packed into measuring cups.
How to Avoid It: Measure ingredients by weight rather than volume, and follow the recipe closely.
Mistake 2: Over-Kneading or Under-Kneading Dough
Kneading is critical for gluten development, but too much or too little can ruin your bread. Over-kneaded dough becomes tough, while under-kneaded dough doesn’t develop enough elasticity, resulting in dense bread.
How to Avoid It: Knead until the dough is smooth and passes the “windowpane test”—stretch a small piece of dough between your fingers; it should form a thin, translucent layer without tearing.
Mistake 3: Wrong Water Temperature for Yeast
Using water that’s too hot can kill the yeast, while water that’s too cold won’t activate it properly. Yeast thrives at temperatures between 100°F and 110°F.
How to Avoid It: Use a kitchen thermometer to check the water temperature before adding it to the yeast.
Mistake 4: Not Proofing Dough Properly
Under-proofed dough results in dense bread, while over-proofed dough can collapse and lose its shape during baking.
How to Avoid It: Proof dough until it doubles in size, typically 1–2 hours. Press a finger gently into the dough; if the indentation springs back slowly, it’s ready.
Mistake 5: Adding Too Much Flour
Adding extra flour while kneading may seem helpful, but it can make the bread dry and dense.
How to Avoid It: Stick to the recipe’s recommended amount of flour. Use only a light dusting on your work surface.
Mistake 6: Using Old Yeast
Expired or improperly stored yeast loses its potency, causing bread to fail to rise.
How to Avoid It: Check the expiration date on your yeast and store it in an airtight container in a cool, dry place.
Mistake 7: Over-Baking or Under-Baking bread recipe
Baking bread for too long dries it out, while baking it too little results in a gummy interior.
How to Avoid It: Follow baking times and check for doneness. A properly baked loaf should sound hollow when tapped on the bottom.
The Secret to Moist Homemade Bread Recipes
Choosing the Right Ingredients for Softness
The secret to moist bread starts with selecting the right ingredients. Using bread flour instead of all-purpose flour ensures better gluten development, resulting in a softer texture. Additionally, incorporating fats like butter, olive oil, or milk enhances moisture and richness in the bread.
Another ingredient that boosts softness is honey or natural sweeteners. They not only add subtle sweetness but also help the bread retain moisture during and after baking.
Pro Tip: Adding a small amount of potato flour or mashed potatoes to your dough can significantly improve moisture retention.
How to Properly Knead and Proof
Moist bread requires perfectly kneaded dough. Proper kneading ensures the gluten structure traps moisture effectively, creating a soft and fluffy crumb.
Equally important is the proofing stage. Allowing the dough to rise in a warm, humid environment helps the yeast work its magic while preventing the dough from drying out. Cover your dough with a damp kitchen towel or plastic wrap during proofing to maintain hydration.
Pro Tip: If your kitchen is dry, place the dough bowl inside an oven turned off with a pan of hot water below. This creates a makeshift proofing box with the perfect humidity level.
Baking Tips to Retain Moisture
The baking stage is crucial for locking in moisture. To achieve this, bake the bread at the right temperature and avoid over-baking. Steam is another secret weapon for moist bread. Adding a pan of water to the oven while baking keeps the air moist, preventing the bread from drying out.
Once baked, allow the bread to cool on a wire rack, but don’t leave it exposed for too long. Wrapping the loaf in a clean kitchen towel while it’s still slightly warm can help lock in moisture without making it soggy.
By following these steps, you’ll consistently bake moist, delicious bread that rivals any bakery’s creations.
Variations of Bread Recipes
Classic White bread recipe
There’s nothing more versatile than a loaf of classic white bread. Made with just a handful of ingredients—flour, water, yeast, sugar, and salt—it’s perfect for sandwiches, toast, or just slathering with butter. Its light and airy texture make it a crowd favorite.
Pro Tip: To enhance the flavor, add a tablespoon of milk powder or replace water with milk for a creamier crumb.
Whole Wheat Bread
For a healthier alternative, whole wheat bread is packed with fiber and nutrients. Made using whole wheat flour, it has a denser texture and a slightly nutty flavor. To keep it soft, include a little honey and olive oil in the recipe.
Pro Tip: Mix whole wheat flour with bread flour in a 50/50 ratio to strike the perfect balance between softness and nutrition.
Sourdough Bread
Sourdough bread is a bakery favorite, known for its tangy flavor and chewy texture. It’s made with a natural sourdough starter, which ferments the dough and eliminates the need for commercial yeast. While it requires more time and effort, the payoff is a uniquely flavorful and healthy loaf.
Pro Tip: Use a Dutch oven for baking sourdough to create a perfect crust with a soft interior.
Specialty Bread: Sweet and Savory Options
Looking for something different? Try making specialty breads like:
- Cinnamon Raisin Bread: A sweet treat perfect for breakfast or snacks.
- Garlic Herb Bread: A savory option loaded with fresh herbs and garlic.
- Cheese Bread: A cheesy, gooey delight made with your favorite cheeses.
Pro Tip: Experiment with add-ins like nuts, seeds, dried fruits, or spices to create unique flavors that suit your taste.
Tips for Storing Homemade bread recipe
How to Keep Bread Fresh Longer
Homemade bread doesn’t have preservatives like store-bought bread, so it can dry out or go stale faster. The key to keeping bread fresh is proper storage. Always allow your bread to cool completely before storing it, as any trapped heat can cause condensation and lead to sogginess or mold.
For short-term storage, wrap the loaf in a clean kitchen towel or place it in a bread box to allow airflow while maintaining softness. This helps preserve the crust while preventing it from drying out too quickly.
Freezing Bread Without Compromising Taste
If you want to extend the shelf life of your homemade bread, freezing is the best option. Slice the bread before freezing so you can thaw only what you need. Wrap the loaf or slices tightly in plastic wrap, then place them in an airtight freezer bag or container to prevent freezer burn.
When you’re ready to use it, defrost the bread at room temperature or reheat it in the oven for a few minutes to restore its freshness.
Pro Tip: For added convenience, freeze individual slices with parchment paper between them to prevent sticking.
Reheating Tips to Restore Freshness
To refresh a loaf that’s gone slightly stale, sprinkle a few drops of water on the crust and warm it in the oven at 300°F for 5–10 minutes. This trick helps restore moisture and makes the bread taste freshly baked again.
FAQs: About Bread Recipes
What are the 7 main ingredients in bread?
The seven key ingredients in bread are:
- Flour: Provides the structure and base for the bread.
- Water: Activates gluten and hydrates the yeast.
- Yeast: Makes the bread rise by producing carbon dioxide.
- Salt: Enhances flavor and regulates yeast activity.
- Sugar: Feeds the yeast and adds a subtle sweetness.
- Oil or Butter: Adds moisture and improves texture.
- Optional Ingredients: Ingredients like milk, eggs, herbs, or seeds can be added for unique flavors and characteristics.
These basic components can be adjusted or customized depending on the type of bread you’re making.
Is it cheaper to make bread than buy it?
Yes, in most cases, making bread at home is more cost-effective. The ingredients for a basic loaf—flour, yeast, water, and salt—are inexpensive and widely available. On average, a homemade loaf costs $1–$2, while store-bought artisan bread can cost $5 or more.
Beyond cost, homemade bread allows you to control the quality and eliminate preservatives found in many commercial breads, making it a healthier and more rewarding option.
What are the 7 common bread-making mistakes and how do you prevent them?
- Incorrect Measurements: Use a kitchen scale for accurate ingredient weights.
- Over-Kneading or Under-Kneading: Knead until the dough is smooth and elastic.
- Wrong Water Temperature: Use lukewarm water (100–110°F) for yeast activation.
- Improper Proofing: Let dough rise in a warm, draft-free spot until it doubles in size.
- Adding Too Much Flour: Use only the amount specified in the recipe to avoid dense bread.
- Using Old Yeast: Check the yeast’s expiration date and store it properly.
- Over-Baking or Under-Baking: Follow baking times and check for doneness by tapping the loaf—if it sounds hollow, it’s ready.
Avoiding these mistakes ensures consistent success in your bread-making adventures.
What is the secret to moist homemade bread?
The secret lies in a few key factors:
- Ingredients: Include fats like butter, oil, or milk to retain moisture.
- Proofing: Keep the dough covered during proofing to prevent drying.
- Steam in the Oven: Add a pan of water during baking to maintain a moist environment.
- Storage: Wrap the bread properly or freeze it to retain its freshness.
By mastering these techniques, your homemade bread will stay soft, fluffy, and irresistibly moist.
Conclusion and Final Thoughts
Why You Should Start Baking Bread Today
Baking bread at home is more than just a way to save money—it’s a fulfilling, creative, and rewarding experience. From the aroma that fills your kitchen to the first warm slice out of the oven, there’s nothing quite like homemade bread. It’s healthier, tastier, and more versatile than store-bought alternatives. Plus, you can customize every loaf to suit your tastes and dietary needs.
Final Tips for Success
To master the art of bread-making, start with simple recipes and gradually experiment with flavors and techniques. Always measure your ingredients accurately, pay attention to proofing times, and use the right baking tools to get the best results. Don’t be afraid to make mistakes—every loaf teaches you something new.
Whether you’re making a basic white loaf, a hearty whole wheat bread, or a tangy sourdough, the process is as enjoyable as the final product. By following the tips and techniques shared in this guide, you’ll soon be baking bread that rivals any bakery.
So, what are you waiting for? Preheat that oven, grab your flour, and start your bread-baking journey today!